

How to Use Waves Tune in Studio One
If you’ve received a promotional offer to purchase Waves plug-ins at a discounted price because you have a copy of Studio One registered to your account, you’re in luck. Many users purchased these plug-ins and face the problem of getting them to show up in Studio One. The information below will guide you through this process.
Setting Up Waves Tune
First, it’s important to know that Studio One 3 Prime does not support the use of 3rd-party plug-ins. You’ll need to purchase or register a copy of Studio One 3 Artist to your account and then purchase the Plug-in Support add-on for Studio One 3 Artist. You can find the link to this store on the official website.
Once you’ve ensured that Waves Tune is installed on your computer and compatible with your version of Studio One, you can open Studio One and create a new audio track. Insert Waves Tune as a plugin on the track and start adjusting the settings to fit your needs. With Waves Tune, you can control the pitch correction amount, the scale you’re working in, and the timing of the correction.
Using Waves Tune for Vocal Tracks
Waves Tune is a powerful pitch correction plugin that helps you achieve a professional-sounding vocal performance. Easily integrated into your workflow, it allows you to fine-tune vocal tracks. The steps for setting up and using Waves Tune involve correcting pitch issues in your recordings. By experimenting with the settings, you can achieve a natural-sounding performance that’s in tune with your music.
If you follow these steps, you can make the most out of Waves Tune and improve your vocal tracks effectively. Enjoy the enhanced sound quality and seamless integration it brings to your Studio One projects.
How to Send MIDI to Waves Plugins in Studio One
How to Send MIDI to Waves Plugins in Studio One.
- Create an audio track and import or record your vocal signal.

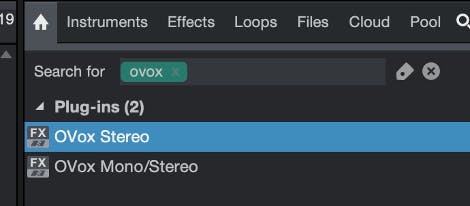
- Search for the Waves plugin you wish to use in your insert plugins list and open it on the audio track.
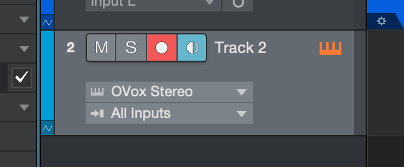
- Create an instrument track, set the Waves plugin as your instrument, and your MIDI controller as the input.

None of the above worked? Contact Technical Support.
How can I get my Waves plug-ins to show up in Studio One?
If you have purchased the Waves plug-ins and are having a problem getting them to show up in Studio One, please look at the information below.
Studio One 3 Prime customers: Studio One 3 Prime does not support the use of 3rd-party plug-ins. You would need to purchase or register a copy of Studio One 3 Artist to your account and then purchase the Plug-in Support add-on for Studio One 3 Artist. Here is a link to Studio One 3 Artist in our store.
https://shop.presonus.com/products/software/studio-one-prods/Studio-One-3-Digital-Downloads
Here is a link to the plug-in Support add-on in our store.
https://shop.presonus.com/products/software/studio-one-add-ons/VST-and-AU-and-Rewire-Support
Studio One 3 Artist customers: Studio One 3 Artist does not support third-party plug-ins without the Plug-in Support add-on. Here is a link to the add-on in our store.
https://shop.presonus.com/products/software/studio-one-add-ons/VST-and-AU-and-Rewire-Support
Studio One 3 Professional:
Studio One 3 Professional supports 3rd-party plug-ins natively.
For a full comparison of what is included in each version of Studio One 3, please visit the following link:
https://www.presonus.com/products/Studio-One/compare-versions
Below you will find information on troubleshooting third-party plug-ins that are not showing up in Studio One 3.
Windows:
- Please open Studio One and go to Studio One>Options>Locations>VST Plugins and verify that you have the correct directory added to the list of folders that the program scans at startup. You want to add the directory that you have your plug-ins installed to. If you do not see the “VST Plug-ins” tab under the Locations tab, then you want to make sure that you have activated Studio One Professional or you have installed the VST, AU, and ReWire support add-on if you are running the “Artist” version of Studio One. Press the “Reset blocklist” button while you are in this window.
- Right-click Studio One and choose “Run as administrator” when opening the program to determine if there is a possible permissions problem.
- Studio One will only load 64-bit plug-ins into the 64-bit version of Studio One. The 32-bit version of Studio One will only load 32-bit plug-ins. If you loaded your VSTs from the c:\Program Files (x86) folder into Studio One under the “Locations” tab, this is more than likely your 32-bit plug-ins. If you need to install a different bit-version of Studio One, you can do so by downloading the desired version from your my.presonus.com account under My Products>Software>Studio One.
- Please click the icon of the wrench in the browser window, at the top, right-hand corner of the window, to open the plug-in manager. Make sure that there is a white dot next to the plug-in, if it shows up in the list.
- If you are still having a problem, try contacting the manufacturer of the plug-in for information about updates, compatibility issues with Studio One, or possible workarounds.
Mac:
- Please open Studio One and go to Studio One>Preferences>Locations>VST Plugins and verify that you have the correct directory added to the list of folders that the program scans at startup. You want to add the directory that you have your plug-ins installed to. If you do not see the “VST Plug-ins” tab under the Locations tab, then you want to make sure that you have activated Studio One Professional or you have installed the VST, AU, and ReWire support add-on if you are running the “Artist” version of Studio One. Press the “Reset blocklist” button while you are in this window.
- Studio One will only load 64-bit plug-ins into the 64-bit version of Studio One. The 32-bit version of Studio One will only load 32-bit plug-ins. If you need to run Studio One in 32-bit mode, simply ctrl-click (right-click) the Studio One icon in your Applications folder and go to “Get Info.” You can then check the box to run in 32-bit mode.
- Please click the icon of the wrench in the browser window, at the top, right-hand corner of the window to open the plug-in manager. Make sure that there is a white dot next to the plug-in, if it shows up in the list.
- If you are still having a problem, try contacting the manufacturer of the plug-in for information about updates, compatibility issues with Studio One, or possible workarounds.